Saturday, February 23, 2013

Removing The Real Wheel From My Motorcycle


Last night I had a breakdown (scroll back to see that post), and today's work was figuring out what went wrong. Turns out the wheel bearings failed. What follows is a photo tour of the process of removing my rear wheel. I figure someone out there could use a visual walkthrough, and what's what the Internet is for.

The photos below are for a 2008 H-D Sportster 883, but  probably aren't very different for other models and makes.

First, support the bike on a lift, in such a way that it won't be a problem when 40 pounds of weight comes off of the rear end later on. I have a cheap Harbor Freight lift, and also one car ramp to support the front wheel when it's off the ground.


The area of operations

The wheel is held on by the axle, which acts as a very long bolt through the middle of the wheel. The axle is held in place by two things: a nut called the axle nut, and a metal clip called an E clip to keep the axle nut from moving even if it were to come loose.

So the second step is to pull off the E clip (a pair of pliers works, just don't bend it), then remove the axle nut. The axle nut was really tight and I couldn't torque it (good!) so I improvised a tool: the handle of my lift is a hollow tube, and it fits nicely over the shaft of my socket wrench.


The socket wrench, with a long enough handle -- the handle of my Harbor Freight lift.

Success! The axle nut and the washer.

Next up, loosen the drive belt. The tension of the belt, as well as the alignment of the rear wheel, is controlled by a pair of eye bolts and the nuts which tighten them. Simply remove the rubber caps, then loosen the belt tensioning nuts all the way. In a few minutes, your belt will be so loose you can remove it by hand.

The tension nuts and rubber caps. The nut changes the length of the eye bolt's shaft, and the eye bolt pulls back on the axle. The right and left side tension nuts are independent, so when we put the wheel back on these nuts will also control whether the wheel is facing straight.

Eventually there was a full inch of slack in the belt and it came off by hand.

Lastly, remove the axle and the wheel will drop off by itself. For the most part, this is done by hammering the left-hand side of the axle, pushing it out the right-hand side. The manual says to use a rubber mallet, but in a pinch I used a hammer wrapped in a rag (this is not good for the rag). I also made a tool to let me hammer it a bit further through, using socket wrench parts.

A rubber mallet... yeah...

To let me hammer an extra inch or so, I made this. It's an extender from my socket set, with an adapter to give it the right width. A rubber mallet or the rag trick, work well to not scratch up my extender.

Eventually, the axle comes out. I usually sit on the right-hand side and tug with a rag. The rear wheel will fall off, so have it supported. I have good boots and big feet, so it works for me to hold the wheel up with my foot as I remove the axle, and let it come down gently.

Right-hand side, the axle is coming out.

Did I mention the spacer on the right-hand side? Don't lose it!

And there you have it: no rear wheel, and open access to check out brake pads, a great opportunity to examine the wheel for cracks, to check out the tire, ...

Wednesday, February 20, 2013

Thieves!


Someone broke into my toolshed, and took off with my tools. Bastards! The causalties include at least the following: two socket sets and a few dozen oddball sockets to fit every cranny of my bike, a nice set of screwdrivers, three sets of crescent wrenches (end wrenches?) and some spanners (crescent wrenches?), tape measure, hammer, various fluids and adhesives, my multimeter, ... They didn't take my lift, presumably because it was held down with my disassembled motorcycle, and my new, expensive brake pads were already on the bike.

Fortunately I live only a few blocks from Autozone, and $120 later I had replaced most of my core stuff PLUS a nifty new torque wrench. Another trip, a toolbox and some plastic boxes, and I'll be back on track.

When it rains, it pours, huh?

Meanwhile...


I've already written up postings on removing the rear wheel, doing the brakes, etc. Look for them in upcoming weeks.

Today I broke in the new tools, by removing the brake rotor and driven sprocket from my trashed rear wheel. My new tire is already here, and the bearings & rim should be here by Monday.

Sunday, February 17, 2013

Bustin' My Balls!   (Trashed wheel bearings)

Yesterday afternoon something felt not QUITE right. The road felt slightly rougher than it should, not the ride but the grindy texture. I thought I heard a squeal once when I stopped, and not like locked brakes (and it wasn't a quick stop). I felt it pull once as if I'd run over a rock, but no rock. Then around sunset as I was pulling in to home, It Happened.

A serious wobble, like a shudder, and a grinding sound from the rear, when I reached 20 mph.

With EXTREME caution, I rode the two miles home at 15 mph, blessed with traffic and speed limits where this was plausible. A little Internetting indicated that these symptoms fit what I had in mind: trashed wheel bearings. And a quick visual inspection confirmed this:


Busted Balls! Only two ball bearings left, and a warped piece of metal.


The nice black ring is gone. The metal ring is ragged and warped. And there are only two ball bearings, inside a lot of worn-down metal. Holy crap!


The bearing pack should look a lot like this one, on the right-hand side of that same wheel.

Good bearings. A nice plastic casing that twirls smoothly with a fingertip.


I pulled off the wheel to get a better look, and took these graphic photos. (viewer discretion is advised)


Busted balls, Batman! Two bearings and a lot of shaved metal.

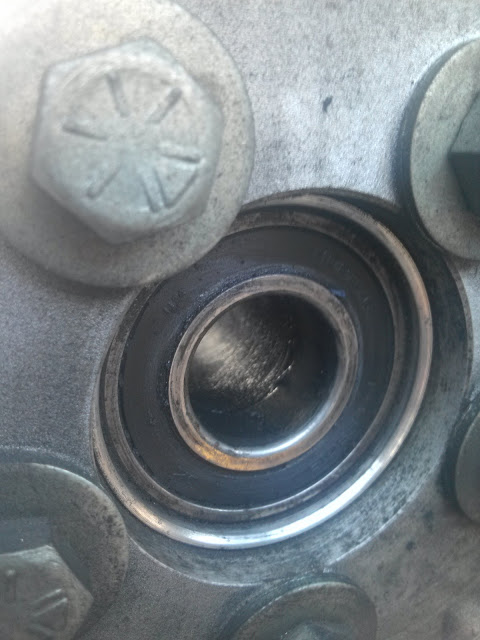
Completely reamed! Beyond the bearing, the wheel has been ground down. That aluminum shouldn't be powder. :(

The shaft that houses the axle, is covered in aluminum dust.

Fortunately the price tag isn't too outrageous. $20 for a new pair of bearing packs (left and right) so I can do them both (if one dies, the other can't be far behind). $150 for a new wheel used off eBay.

I'm fortunate that last night's fiasco happened exactly as it did. The wobble started when I was doing 25 mph and only two miles from home. Traffic was light residential, I didn't catch flak for holding up traffic. And none of the repairs are beyond what I can manage, once the parts come in.

There's even a side benefit here. Now that I have the rear wheel off, I can take a critical look at my brake pads. And I'm really looking closely at the tire and finding that it's more bald than I like. And speaking of brake pads, how are the front ones anyway? So, on to some more checkups and maintenance.

A side question

I took my bike in for maintenance at the 30k mark two months ago, and have put on maybe 500 miles since then. Is this something that the mechanic should have noticed? Should they have been replaced just because of the mileage? Or does this Just Happen without anyone to blame?